Composting Toilets - Installation
Who can install a composting toilet?
Anyone can install one of our composting toilets in about half a day. If you do not require council approval for the system just follow the DIY instruction manual for composting toilets and the greywater system.
If you are installing the toilet in New Zealand and the system requires council approval, a plumber is usually required to sign off on the installation.
Tools and material required:
- Phillips & flathead screwdriver
- Electric drill with a hole saw bit
- Jigsaw
- Wire cutters
- PVC non-pressure pipe glue
- Silicone
- Shovel (for bathtub sized absorption trench)
The ventilation system is powered by 12 or 24 volts, so you do not need an electrician to connect the fan to the power source. If you are using the fan from mains power, you will need to ensure you have a power point near the ventilation pipe. If the fan is solar powered, follow the manual’s instructions on connecting to the solar regulator.
Installing split systems
A hole needs to be cut through the bathroom floor for the waste chute, and a space of between 450mm- 750mm high is required beneath the flooring where the toilet pedestal/bowl is located. This space houses the compost treatment chamber.
If you do not have the required height, it may be possible to modify it by creating different flooring levels within the bathroom, or if you have a sloping block you can position the toilet above the void under the floor.
The standard waste chute is 550mm long however, additional waste chute length and seal can be provided if the height between floor and ground is greater than 550mm plus the chamber height.
With all CM split systems only one toilet pedestal can connect to a chamber.
Nature Loo and CM composting toilets do not need to be installed on the north side of a home. The full chamber that is no longer connected to the pedestal is best positioned in direct sunlight.
Split level systems such as CMHP/CMLP composting toilets require less than half the space of other factory built composting toilets. This is an important point to consider depending on your sub-floor structure. A footprint of approximately 1m square is required to install a CMHP- CMLP compost toilet.
You need to access your CMHP/CMLP composting toilet to change the chambers. We recommend preparing a one square meter concrete pad for the in-service chamber directly below the pedestal, or letting it sit on a couple of timber sleepers, which can act as runners for the chamber wheels.
The centre of this pad lines up with the centre of the waste chute and pedestal. Ideally the pad area will have a small incline or fall (20mm over 1000mm, ¾ inch over 3 feet) and falls towards the excess liquid pipe. This helps drain the chamber.
Installing “self-contained” systems
Self-contained units are very compact with an exchangeable compost treatment chamber inside the toilet pedestal. The lid of the toilet pedestal is lifted to rotate the compost chambers.
The capacity of these systems is less than split systems, but they can be installed anywhere.
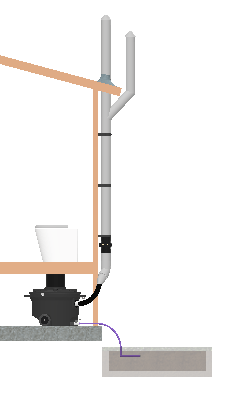
The only constraint is that the toilet must be positioned on an outside facing wall to allow the 50 mm ventilation pipe and 19 mm liquid drain hose to exit the bathroom.
If this is not possible then the 19 mm pipe can be laid into the foundations to allow liquid to escape and the vent pipe can rise vertically through the ceiling.
Ventilation system
The 12-volt fan runs the ventilation system 24 hours a day to continuously circulate air through the compost heap.
The air is drawn down through the toilet pedestal, through the compost chamber and then exits via the vent pipe. This set-up ensures that no odours enter the toilet space.
PVC connections are provided including vent caps and insect proof mesh however, you will need to purchase a length of 100mm PVC waste pipe for the vent, and brackets to fix the pipe to the side of the building. The length of pipe needs to extend up to 600mm above the highest point of your roof.
Using mains power
A 240/12-volt regulated transformer, extension wire and connectors are all included with the toilet to run the fan from mains power.
Using the solar kit
The 40-watt solar system includes all the components required to complete installation. The 4m external double insulated cable and 4m standard cable provided should be sufficient to locate your panel where it will best capture the sun’s rays.
Note – the 40-watt solar system is generally too small for New Zealand sunlight conditions. Please contact us for details on a 50-60-watt system which we can arrange for you.
If your house is already solar powered, you will have a battery bank that will generally be either 12-volt or 24-volt DC. If you have a 12-volt system, just connect the battery directly to the fan. Do not forget to put a 0.5-amp fuse in line to the fan.
If you have a 24-volt system, ask us for a 24-volt fan which will allow you to run the fan directly from your 24-volt battery bank. The fan will use about 6-amps of power on a 12-volt system.
If you have an inverter, do not use it. The inverter will run very inefficiently when it is powering the small fan and you will waste power.
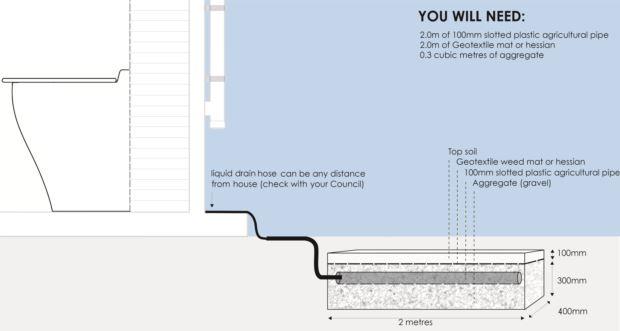
Excess liquid absorption trench
The liquid discharge connection must be permanently connected to a small absorption trench as shown in the diagram.
The compost chambers are supplied with the liquid drain valves, connectors and 1.5m of drain hose (either 19mm or 25mm). You may need to buy a length of 50mm PVC pipe to connect the hose to the slotted agricultural pipe in the absorption trench.
The length will depend on where you choose to put the trench. Both the in-service (being filled) and out-of-service compost chambers should be connected to an absorption trench if you are using the Classic 750.